- If you don’t measure it, you can’t manage it.
- Soil nutrient levels can vary both between and within paddocks on the same farm and differently for various nutrients.
- A good soil testing program involves testing every paddock over 3-5 years with a proportion tested each year and cropping paddocks may need to be tested each year.
Key points
Background
Soil testing on farms is undertaken to check soil fertility and to better predict plant nutrient requirements using a nutrient budget, to assess if soil nutrient concentrations have changed over time and if current nutrient management practices are suitable or the existing fertiliser program needs to be adjusted, or to help determine the reason for poor plant growth (Blaesing 2017). Farm fertiliser recommendations require supporting soil and plant chemical analysis and interpretation (Smith et al. 2012). Most soil tests are conducted on topsoil samples, but subsoil testing may be required to investigate potential subsoil constraints to plant root growth. Soil testing can be complemented by monitoring of nutrient uptake via plant testing at different growth stages, so that adjustments can be made with topdressing rates and/or with foliar application of additional nutrients.
The ongoing intensification of farm operations and increasing pressure for efficient resource use for improved financial and environmental outcomes requires the application of more precise nutrient management on Tasmanian farms. The soil nutrient testing undertaken as part of the Fert$mart planning process on 109 Tasmanian dairy farms identified that only 3.7% of paddocks tested had soil nutrient levels in the optimum range for all the four nutrient measures of pH, Olsen phosphorus (P), extractable potassium (K) and sulphur (S). There was uneven distribution of nutrient concentrations across the farms with some farms containing paddocks with Olsen P concentrations below the agronomic optimum concentration, while also containing paddocks with excessive Olsen P concentrations. This variability may be attributed to different soil types, previous fertiliser and effluent applications, and grazing management practices. The uneven distribution of soil concentrations of P, K and S across individual farms can best be demonstrated by colour coded nutrient maps (Figure 3) that show how different nutrients usually have different distribution patterns. If the soil levels of three macronutrients are variable, it can be expected that other nutrients also vary across the farm. This is why every paddock on a farm should be soil tested over time.
Soil characteristics and productivity can also vary significantly within paddocks, but fertilisers and lime are normally applied uniformly to grassland paddocks based on soil test results. Within paddock spatial variability of nutrients is often ignored and consequently some parts of the paddock may receive excessive fertiliser and are at risk of nutrient runoff or leaching, while other parts may suffer nutrient deficiency due to under-application and not reach optimal levels of grass or crop yield. Soil nutrient levels on Tasmanian dairy pasture paddocks were found to be highly variable within paddocks (Cotching et al. 2019) (Figure 4) due to : Soil type, surface water movement (particularly K), cows standing near the gate (nutrient loading), poor growth due to pugging/dryness/wetness (i.e. less nutrient removal), silage/hay feeding out (nutrient loading), variable grazing frequency (dirty grass, less removal), low productivity/less palatable species (less removal), cows standing at one end of paddock in cold/wet weather, trees & hedgerows for cow shelter; and clearing/burning of previous vegetation. There was decreasing trend in nutrient concentration with increasing distance from the gate in most of the paddocks. The implications are that P and K fertiliser input on up to 20% of the paddock in from the gateway can be eliminated without compromising pasture productivity, depending on an assessment of soil test results, a farm scale nutrient budget and paddock condition.
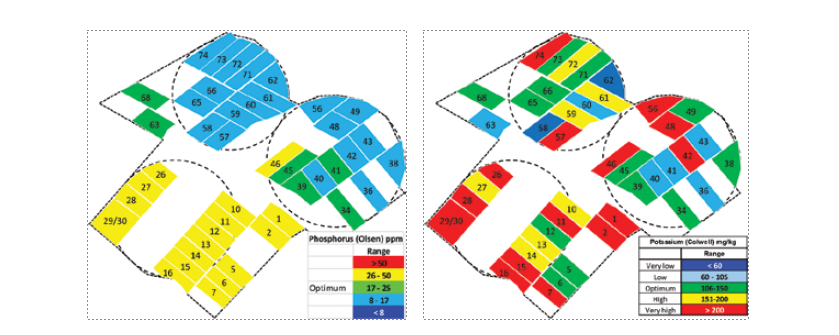
Figure 3. An example of how soil nutrient levels (potassium on the left; phosphorus on the right) can vary both between nutrients and between paddocks on the same farm.
This spatial variability of soil nutrients within paddocks means that there is scope for the use of precision agriculture for within paddock nutrient testing and fertiliser/lime application. These practices are being adopted by some Tasmanian farmers with variable quantities of fertiliser being applied within individual both cropping and dairy pasture paddocks using currently available variable rate control systems. This is providing substantial improvements in productivity by optimising yield and reductions in overall fertiliser use.
General soil testing recommendations
Paddocks or groups of paddocks that have the same management regimes or yield performance and that differ from those of other paddocks or zones can be grouped into individual management zones for soil testing. In cropping systems, these differing regimes could include fertiliser application methods (banding, previous placement, broadcasting, fertigation) and tillage methods (i.e. spading, raised beds, minimum tillage). In grazed pasture systems, these regimes may also include day and night paddocks, regular fodder harvesting, high feeding areas, effluent application areas and extensively managed run-off blocks.
Soil test representative management zones regularly, every 2-3 years or more frequently if high value crops are grown annually. If you are on a new farm, the investment in soil testing every paddock initially will pay off. Plan your soil testing program with your agronomist and maintain it annually. A good soil testing program for grazing systems and orchards involves testing every paddock over 3-5 years with 20-30% of paddocks tested each year. Paddocks used for cropping may need to be tested each year or definitely ahead of the highest value crop in the rotation or a crop with specific nutrient and or pH requirement (e.g. poppies, potato or brassica crops). Avoid sampling within 3 months of liming or within 6-8 weeks after applying any fertilisers or soil amendments as this can lead to incorrect interpretation of results.
If the variation in soil type in a paddock affects crop performance, then individual areas should be sampled. The variation may be determined by observation of soil type differences or by yield mapping using GPS or NDVI (normalised difference vegetation index) maps. If the paddock is to be treated as one management unit, fertiliser decisions may be based on results from the dominant soil type or area of performance.
Keeping track of your soil test results is important. Often a colour-coded farm map is a good way to visualise fertility across the farm (Figure 3). Keep your soil tests in a safe place and use them to build a picture over time of how fertility, pH and organic carbon are changing on different parts of the farm.
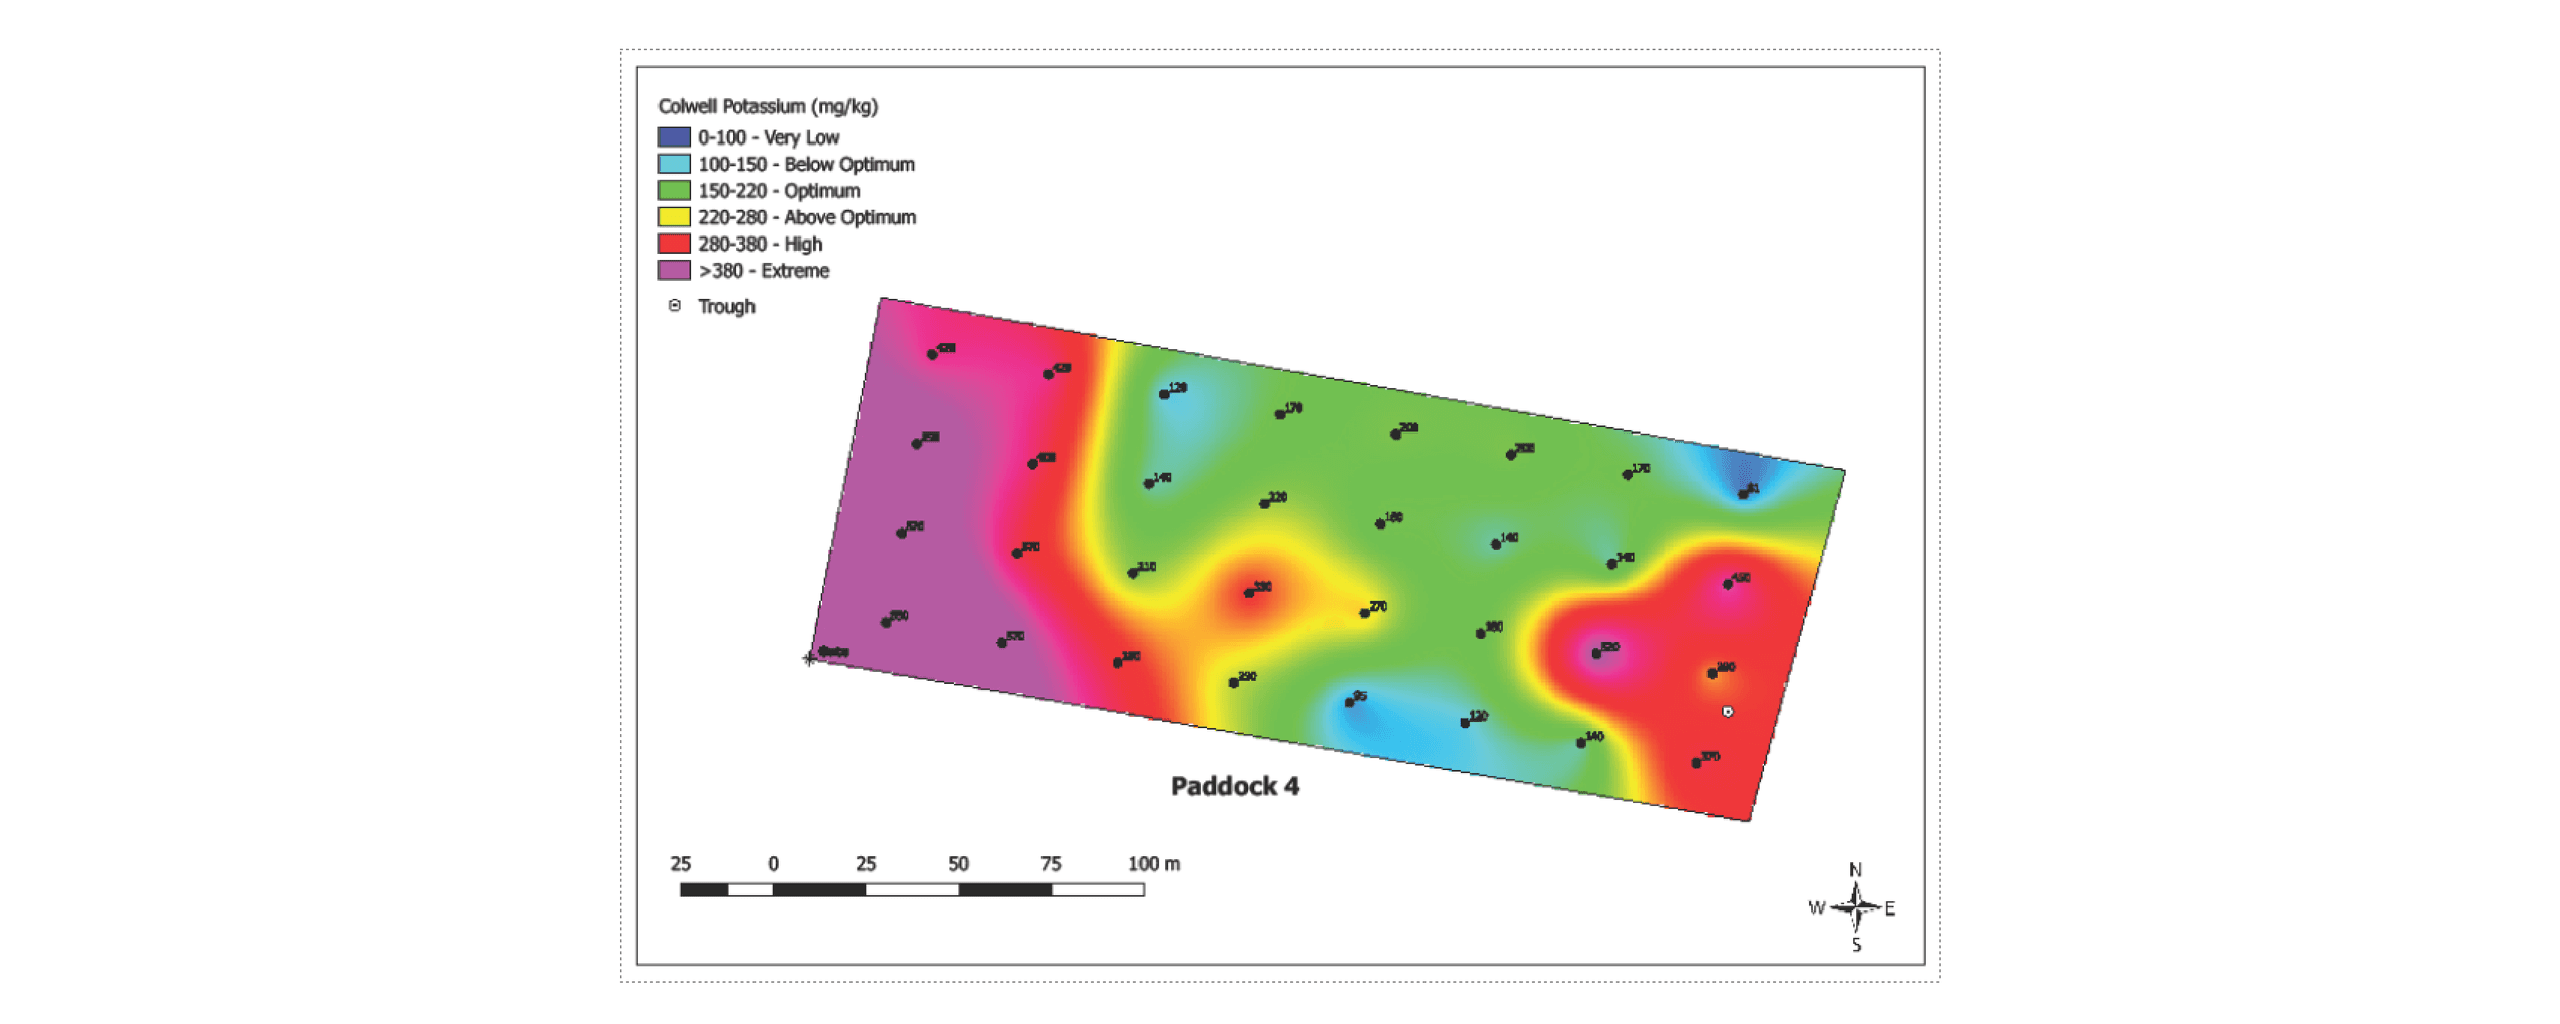
Figure 4. Within paddock nutrient (Colwell potassium) variability on a diary pasture paddock. (Image by Luke Taylor).
Soil sampling procedure
It is important to collect a representative sample of the paddock as the sample sent to the laboratory represents around 0.00001% of the field soil being assessed (Gourley and Weaver 2019). Identifying changes in soil properties requires sound soil sampling techniques with repeated sampling over many years as many soil properties change only slowly with time. The more consistent your sampling procedure is, the more consistent and useful your results will be. Refer to the Fertcare soil sampling guide and associated information (Gourley and Weaver 2019).
The following points should be considered when testing a soil:
- Changing laboratories can change results. The results you get from year to year will be more consistent and comparable if you use the same laboratory each time.
- Make sure the laboratory you are using is accredited for all the tests you are paying for. The laboratory should have National Association of Testing Authorities Australia (NATA) and/or Australasian Soil and Plant Analysis Council Inc. (ASPAC) accreditation for all the tests as these labs have proficiency testing programs for quality assurance and cross checking of analytical results.
- Make sure you sample at the same time every year, preferably when you can be sure that the soil moisture will be the same, as differences in soil moisture can affect the results. The preferred time is usually spring or late winter.
- It is important to avoid small, atypical areas in the paddock, e.g. changes in soil type, breaks in slope, fence lines, gateways, around troughs, pugged areas, waterlogged patches and obvious stock camps, unless your aim is to diagnose nutritional issues in unusual areas. Avoid taking samples from where there are obvious dung or urine patches, or from where plant growth appears unusually good or poor.
- Sampling along the same transect or path each time minimises variability. There are several different sampling patterns that can be used to give reliable results for soil testing, including sampling a zig zag pattern across a paddock, walking a circle around a paddock, a defined transect across every paddock and marking the end of each transect using a GPS and/or by painting fence posts. A grid pattern of sampling is normally used for precision agriculture.
- The cores should be spread out evenly along the transect.
- Sample to the same depth every time the paddock is sampled (100 mm is standard for pasture and 150 mm for cropping in Tasmania). It is difficult to compare results from samples that have been taken from different depths.
- Subsoil samples may be used to determine constrains to root growth (e.g. due to pH) or nutrient uptake by deep rooted crops, especially perennial crops. Looking deeper is also recommended for available nitrogen monitoring (e.g. deep soil N or N-check).
- The soil samples should be taken using a tube sampler, rather than a spade to avoid the collection of tapered samples, as all depths should be equally represented in the sample.
- Collect 25 - 30 individual cores (25 mm diameter tube) per paddock or management zone. These should be mixed to form the sample for the paddock. As paddock size increases, so should the number of cores. The number of cores required for subsoil samples can be reduced as subsoils often show less variability than surface soils.
- The cores should be collected into a clean bucket (with no trace of fertilisers in it), mixed well and put into a clean plastic bag.
- Make sure all samples are labelled clearly (some laboratories will supply labels).
- Keep samples cool (in an esky) before sending to the laboratory ASAP. Samples allowed to sweat in the bag can affect results. Avoid timings that will lead to samples being stuck in the mail or with a courier over the weekend.